How to crop photos on iPhone
How to crop photos on iPhone
In today’s digital age, smartphones have become our primary tools for photography. The iPhone, in particular, boasts a powerful camera that allows users to capture stunning images with ease. However, capturing the perfect shot isn’t always about taking the photo; it’s often about the post-processing too. One essential editing skill every iPhone user should master is photo cropping. In this guide, we’ll walk you through the steps to crop photos on your iPhone effectively, ensuring you can highlight the best aspects of your images.
Do you want a budget-friendly laptop for your daily needs then get Acer Aspire 3 A 315 Review and you will easily know more about the specifications of this brilliant machine.

How to Crop Photos on iPhone: Step-by-Step Guide
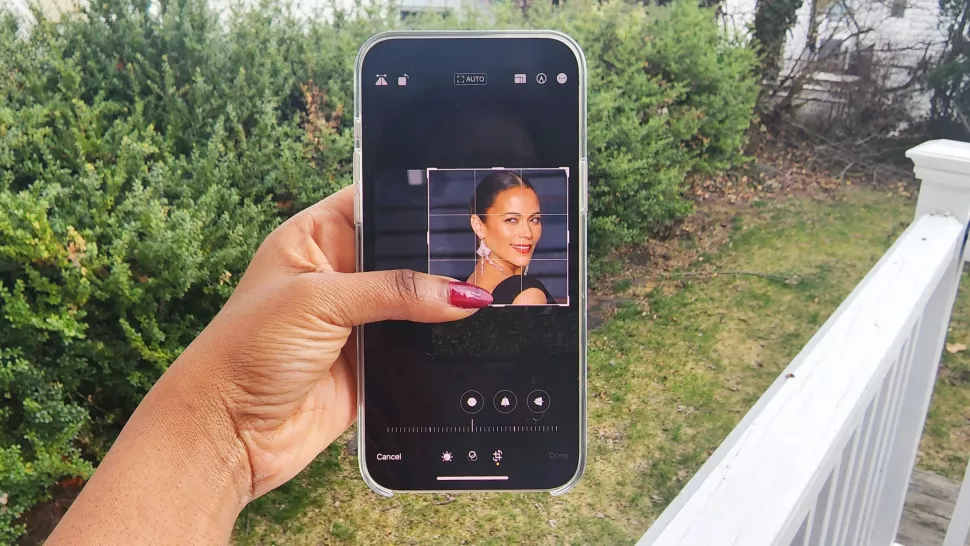
Cropping a photo on your iPhone is a simple process that can greatly enhance your image’s composition. Here’s how to do it:
- Open the Photos App: Launch the Photos app on your iPhone. Scroll through your albums and select the photo you want to crop.
- Tap “Edit”: Once you’ve chosen the photo, tap the “Edit” option located at the top right corner of the screen.
- Select the Crop Tool: In the editing interface, you’ll find a crop icon (a square with overlapping corners). Tap this icon to access the cropping tool.
- Adjust the Crop Frame: A bounding box with handles will appear around your photo. Drag the handles to adjust the crop frame. You can also pinch in or out to resize the frame manually.
- Choose a Preset Aspect Ratio: At the bottom of the screen, you’ll see preset aspect ratio options such as Original, Square, 16:9, etc. Selecting an aspect ratio can help you maintain proper proportions while cropping.
- Freeform Cropping: If you prefer, you can also use freeform cropping. Tap the aspect ratio option until you see “Freeform.” This allows you to crop without specific proportions.
- Reposition the Image: If necessary, you can move the photo within the crop frame. Drag the image to align it with the desired composition.
- Fine-Tune with Tools: Use the tools provided, such as the dial icon, to make additional adjustments. The dial tool can help you straighten horizons or rotate the image slightly.
- Apply the Crop: Once you’re satisfied with the crop, tap “Done” at the bottom right corner of the screen. Your edited photo will be saved.
- Save a Copy: If you want to keep the original photo, ensure you save a copy before cropping. Tap “Save as Copy” to preserve the untouched image.
Tips for Perfect Photo Cropping
- Rule of Thirds: When cropping, consider the rule of thirds. Imagine a grid with two horizontal and two vertical lines, and position your subject along these lines or at their intersections.
- Maintain Resolution: Be mindful of the resolution when cropping. Avoid excessive cropping, as it can lead to a loss of image quality.
- Experiment with Composition: Cropping can dramatically alter the composition of your photo. Experiment with different crops to find the most visually appealing arrangement.
- Focus on Details: Use cropping to emphasize specific details in your photo. Whether it’s a person’s face or a particular object, cropping can draw attention where you want it.
- Balance and Symmetry: Achieve balance and symmetry by ensuring your subject is centered or placed intentionally off-center within the frame.
Enhancing Your Cropped Photos
Cropping is just the beginning of enhancing your photos. After you’ve cropped your image to perfection, consider using these additional techniques to make your photos truly stand out:
- Adjust Brightness and Contrast: Use the built-in editing tools to fine-tune the brightness, contrast, and exposure of your photo.
- Apply Filters: Experiment with filters to add mood and style to your cropped image. The Photos app offers a variety of filters to choose from.
- Use Third-Party Apps: Explore third-party editing apps available on the App Store for more advanced editing options and creative effects.
- Share and Showcase: Once you’re satisfied with your edited and cropped photo, share it on social media platforms or showcase it in a digital photo frame.
FAQs About Cropping Photos on iPhone
Can I undo a crop on iPhone?
Yes, you can undo a crop by selecting the “Edit” option again and tapping the crop icon. This will bring up the crop frame, where you can adjust or revert the changes.
Will cropping affect the original photo?
Cropping on iPhone doesn’t affect the original photo. The app creates a copy of the edited image while keeping the original intact.
Are there any third-party apps specifically for cropping?
While there are several third-party photo editing apps available, some apps focus primarily on cropping, offering advanced features beyond the built-in tools. One such app is “Snapseed.”
Can I crop without using preset ratios?
Absolutely. Choose the “Freeform” option when selecting an aspect ratio. This allows you to crop without any specific proportions, giving you more creative freedom.
How do I maintain image quality after cropping?
To maintain image quality, avoid excessive cropping. The more you crop, the more you risk losing resolution. Start with a well-composed photo to begin with.
Can I crop non-rectangular shapes?
With the built-in tools on the iPhone, cropping is limited to rectangular shapes. However, third-party apps might offer more shape options for cropping.
Conclusion: Elevate Your Photo Editing Skills
Cropping photos on your iPhone is a valuable skill that can transform your images from good to great. By mastering this technique, you’ll be able to emphasize key elements, eliminate distractions, and enhance the overall visual appeal of your photos. Whether you’re sharing on social media, creating a portfolio, or preserving memories, the ability to crop photos effectively will undoubtedly elevate your photo editing skills.


One Comment